 Brewblox
(Deprecated) Automation sandbox
DANGER
The automation service is deprecated, and will be disabled in a future update.
Details
We've taken a long hard look at our automation service and its backlog, and concluded that we need to drastically curtail our ambitions here.
The purpose of the automation service is to support custom functionality that is not (yet) provided by the Spark firmware. There are plenty of use cases for this, ranging from recipe integration to automated alerts to custom sensors and actuators.
Backlog estimates, and our experience making the main UI more user-friendly paint a less rosy picture. The runtime engine for executing custom automation functionality is relatively simple. Building an editor UI to handle all desired native and custom functionality is not complicated either, but it is a lot of work. Making said UI intuitive and user-friendly while handling complex control logic takes even more work.
Brewblox is process control software with an emphasis on brewing. Adding a generic low-code platform would be a prime example of the Not Invented Here syndrome.
A happy compromise is to make our software compatible with one or more off-the-shelf low-code platforms. The important thing is that users should not have to switch UIs when brewing. This can be accomplished if the external editor is only required for creating the custom subroutines, and the Brewblox UI is used to start/stop/monitor them.
We've had good experiences with our prototype integration with Node-RED, and will continue development there. Integrations with Brewfather, Home Assistant, and IFTTT are also under consideration.
To summarize:
- We are ending development of the current automation service.
- We will keep developing automation functionality.
- You can use a third-party editor to create and edit automation subroutines.
- You should not have to switch UIs during brew days or active fermentations.
Introduction
To aid with complex or repetitive tasks, the automation service supports using scripted conditions and actions. Scripts are written using JavaScript, and can see and change blocks on the Spark. Scripts are editable in the Brewblox UI, and tooling is provided to make it easy to get started.
Editor
To assist with editing scripts, the editor offers Previews and Snippets.
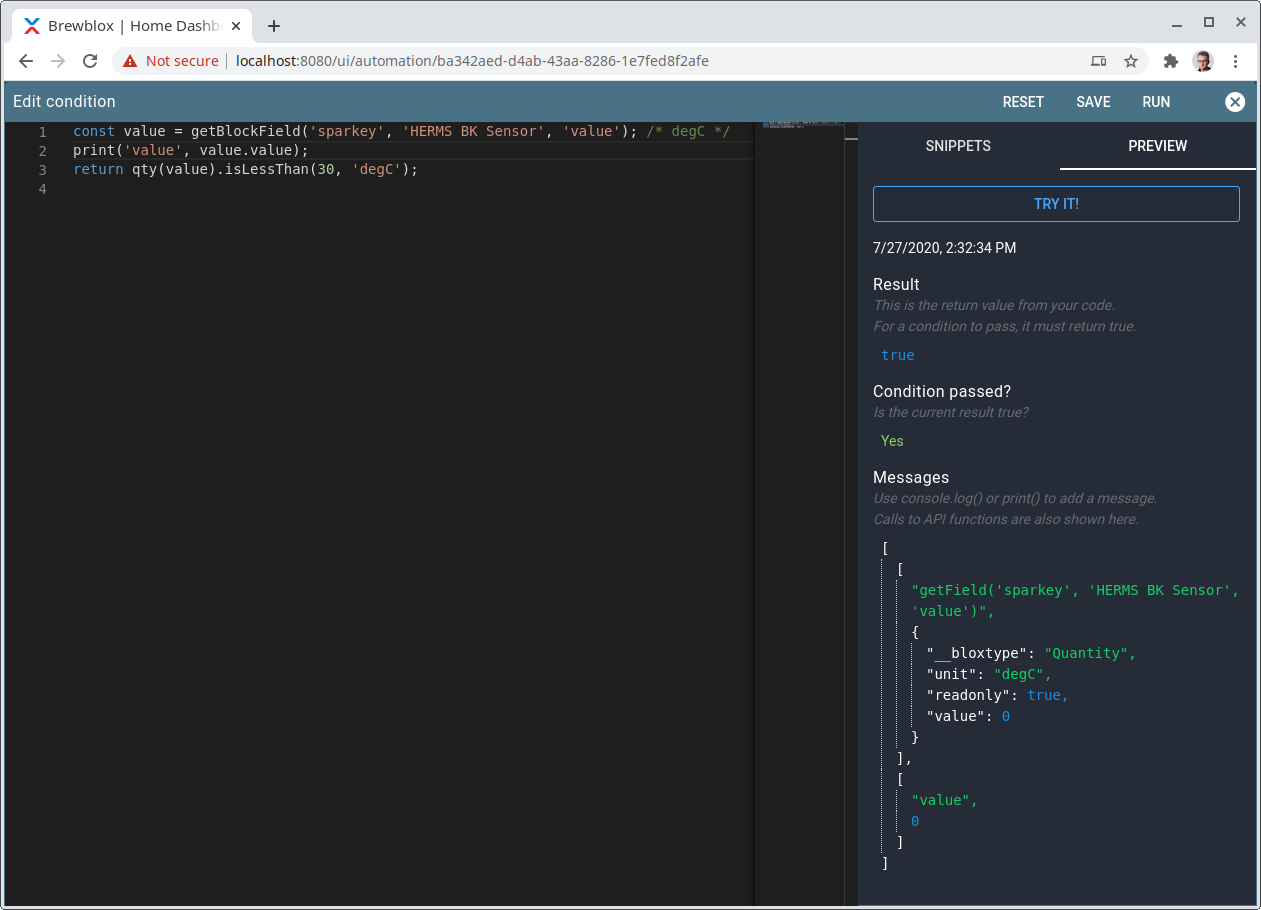
When you click the "Try It!" button (or press Ctrl+Enter), the code in the editor is sent to the automation service to be evaluated.
You can see the return value from your script here, and all generated messages. In the screenshot we have two messages: one generated by the getBlockField() function, and one we added by using the print() function.

Snippets are a quick way to get started writing scripts. They can ask you to select a value in a dropdown, and will then convert your selection into code.
You can then modify the generated code to your liking.
Async functions
In JavaScript, functions that have to wait for something to finish are declared async.
API functions that have to make a network call (saving blocks, publishing events, making HTTP requests) are async.
When calling an async function, you need to put the await keyword before your call:
const value = await asyncFunction();Example:
const block = getBlock('spark-one', 'Ferment Fridge Setpoint');
block.data.setting = qty(20, 'degC');
await saveBlock(block); // change value on other service -> async
API
Scripts are run in a sandbox. This means that they are isolated from the rest of the program.
We added some helper functions to make it easy to write scripts.
print(...args)
The print() function adds a message to the preview output. When executing the process, messages are logged but not evaluated.
You can add as many arguments as you want. Objects ({ key: 'value' }) and lists (['value']) can be printed, and will be rendered as collapsible items in the message view.
console.log(...args) is an alias for print(...args).
Example:
print('value 1', 1234, {key: 'value'}, ['value1', 'value2']);
console.log('value 1', 1234, {key: 'value'}, ['value1', 'value2']);
getBlock(serviceId, blockId)
getBlock() finds a currently active block with the requested ID.
It returns null if the block was not found.
For a description of how a block looks like, see the block types documentation.
In the editor is a snippet that lets you select a block from a dropdown, and then generates the getBlock() call.
Example:
const block = getBlock('spark-one', 'Ferment Fridge sensor');
print(block);
getBlockField(serviceId, blockId, fieldName)
Often you don't need the full block, but only a specific value.getBlockField(serviceId, blockId, fieldName) returns that value.
For a description of what fields are available for each block type, see the block types documentation.
In the editor is a snippet that lets you select a block and a field from dropdown menus, and then generates the getBlockField() call.
Example:
const field = getBlockField('spark-one', 'Ferment Fridge sensor', 'value');
print(field);
blocks
blocks is a list of block objects. It contains all blocks from all Spark services.
Typically you want to use getBlock() or getBlockField() if you want a specific value.
For a description of how a block looks like, see the block types documentation.
Example:
print(blocks);events
events is a list of cached Spark state or history events.
The data also includes published topic, and time received. Only the last received event for a given topic is included. If you want to read events published by your service here, it is advised to publish to a unique topic.
Example:
print(events)qty(field) / qty(value, unit) / qty(duration)
Many block fields are quantities. This means that they have both a value (eg. 10), and a unit (eg. degC).
If you print them, they will look like
{
  "__bloxtype": "Quantity",
  "unit": "degC",
  "value": 10
}
The qty() helper function takes this data, and creates a Quantity object that lets you convert and compare quantities.
You can call qty() in four different ways:
- With a block field that is a quantity object:
qty(getBlockField(...)) - With a value and a unit:
qty(20, 'degC') - With a time string:
qty('1d2h8m') - Another
Quantityobject:qty(qty(20, 'degC'))
You can compare two quantities if the units are compatible. degC and degF are compatible, but degC and delta_degC are not.
Available comparison functions are:
eq(other)orisEqualTo(other)lt(other)orisLessThan(other)lte(other)orisLessThanEqual(other)gt(other)orisGreaterThan(other)gte(other)orisGreaterThanEqual(other)compareTo(other)
The argument(s) for all comparison functions are the same as that for qty() itself.
All comparison functions except compareTo() return a boolean true/false.compareTo() returns -1, 0, or 1, depending on whether the base or compared quantity is higher.
Examples:
qty('1h10m').eq(70, 'min'); // true
qty('1h10m').eq(qty(70, 'min')); // true

qty(20, 'degC').lt(50, 'degF'); // false
qty(20, 'degC').isLessThan(50, 'degF'); // false

qty(20, 'degC').lte(20, 'degC'); // true
qty(20, 'degC').lte(21, 'degC'); // true

qty(20, 'degC').gt(50, 'degF'); // true
qty(20, 'degC').isGreaterThan(50, 'degF'); // true

qty(20, 'degC').gte(20, 'degC'); // true
qty(20, 'degC').gte(19, 'degC'); // true

qty(10, 'degC').compareTo(15, 'degC'); // -1
qty(15, 'degC').compareTo(15, 'degC'); // 0
qty(20, 'degC').compareTo(15, 'degC'); // 1
To convert a quantity to another compatible quantity, you can use the to(unit) function. When converting a quantity, the original is unchanged.
Examples:
qty('10m').to('s');
qty(20, 'degC').to('degF');const original = qty(20, 'degC');
const converted = original.to('degF');
print(original.value, original.unit); // [ 20, 'degC' ]
print(converted.value, converted.unit); // [ 67.9999, 'degF' ]You can also add or subtract one quantity from another. As with conversion, all mathematical operations return a new quantity, and leave the original unchanged. The new quantity has the original's unit.
When modifying absolute temperatures (degC, degF), the argument must be a relative value (delta_degC, delta_degF).
Available operations:
plus(other)minus(other)
Examples:
const original = qty(20, 'degC');
const other = qty(20, 'delta_degF');

const result = original.plus(other);
print(original.value, original.unit); // [ 20, 'degC' ]
print(result.value, result.unit); // [ 31.11111, 'degC' ]
saveBlock(block)
To change a block on a Spark, you need to explicitly save it.
It will write all values in the block data you send, except for readonly fields. Those are ignored.
This is an async function, and must be called using await.
Example:
const block = getBlock('spark-one', 'Ferment Fridge setpoint');
block.data.storedSetting = qty(20, 'degC');
await saveBlock(block);
publishEvent(topic, payload)
You can publish arbitrary MQTT events with the publishEvent() function.
You can send objects or lists as payload. They will be automatically converted to a JSON string.
This is an async function, and must be called using await.
Example:
await publishEvent('brewcast/history/my-process', {
  key: 'my-process',
  data: {
    'value': 1234,
  },
});
Everything after brewcast/history in the topic is optional, but recommended. It makes it easier to identify and listen to your events while debugging.
axios
Axios is a popular JavaScript library for making HTTP requests. It comes pre-installed in the automation sandbox.
HTTP requests are always made from the automation service, both when the process is running, and when you are previewing your script.
Example:
const resp = await axios.get('https://www.example.com');
print(resp);
return resp.status === 200;